
For those of you that don’t know, I’m addicted to pizza. Thick, thin, pan, deep dish, Italian, American, Naples, New York, Chicago, Naples again, Ancient Roman, wood oven, kamado, tandoor, vegetarian, Japanese squid and egg, Mongolian yak cheese… you name it, I’ll try it on a flat crust. I absolutely can’t get enough of the stuff. And I pay a heavy tax for that to the weight management gods who barely control my indulgences with threats of bulging waistlines. That said, you’d have to work pretty hard to find a pizza I don’t like, probably by starting in the frozen foods aisle at Discount Trader’s Megalopolis Mart.
I have lots of things to say about building wood-fired ovens and finding stones for pizza decks. I’m far too picky when it comes to the differences in coal and oak as heat sources. There are no fewer than a dozen different crust recipes inside my head some of which take hours to prepare. My Parmesan budget alone rivals small island economies in the Mediterranean. I promise to write out all these culinary gems over a protracted amount of time so you don’t get pizza overexposed but I have to start somewhere. Step into my personal wayback machine.
In my cheese-laden childhood, I have a very distinct memory of the pizza I want to show you now. Sure my moderately rural and completely ‘meat-and-potatoes’ hometown had the ubiquitous national pizza chains with catchy slogans aimed at growing teen demand but there were also some fine local pizzerias that cranked out more classic examples. That was probably a sign of things to come considering there wasn’t an Italian within 500km and ‘pasta’ just meant spaghetti and meatballs to everyone I knew back then. I remember being mesmerized by one spot with a real refractory dome oven made of clay that was powered by split oak logs. The intrepid owners stirred up all manner of intrigue by hanging a sign on the side that proudly proclaimed ‘”Imported from Italy”. And this was the seventies long before that became chic in North America. Of course my infatuation might have had something to do with the cute redheaded waitress that always gave me extra garlic bread but let’s pretend it was all about the food. Those early pizzas certainly inspired me but they’re not the pizza I’m talking about here. I’ll save the semolina ’00’ flour and basil species discussions for later.
Across the street from my school was a little diner counter that served up stock standard burgers and chips with Norman Rockwell milkshakes and a well stocked candy counter clearly capitalizing on the hoards of preteens walking past their door every day. It was surpassed in popularity only by the doughnut shop next door who wisely closed early in the afternoons. Given the steady stream of not-so-discerning customers loaded with pocket money, it was all they could do to keep up with the ravenous appetites hell bent on sugar, salt, and anything fried that their parents wouldn’t let them have at home. Back then the modern pizza craze was just gaining steam and the owners decided to add some to the menu, presumably for their evening crowd when the kids had gone home.
I still remember the whirlwind of rumours that swept the playground that week. “They have pizza!” It was my first lesson in directed marketing and it worked like a charm. A bit too well. All the kids in queue kept ordering pizzas. Whole pizzas. Not just by the slice as the owner had imagined. Apparently my schoolmates were picky about what went on top. “Can I get, uhm… one half pepperoni, and one quarter sausage… what Darla? You don’t want what? Ok, make that one third pepperoni, one third….” You see how quickly the diner needed to rethink giving ten-year-olds choices.
After a month or two of their menu experiment gone awry, they reduced the offerings to just three options in the pizza department so their line cooks wouldn’t quit in protest. Pepperoni, extra cheese, or the chef’s whim of the day which was, as you might have guessed, often just pepperoni and extra cheese. Whole “sheets” only. And what you got fifteen minutes later was a piping hot pan full to the brim of the simplest pizza they could muster for five bucks. Nothing fancy, nothing elaborate, and never so many choices that they couldn’t keep up with the steady stream of kids. They had it down to a science cranking out at least a few dozen every lunch hour for those young rebels that eschewed the school cafeteria.
It’s worth noting that this wasn’t the contemporary problem of junk food profiteers supplanting home lunches or industrial overlords hijacking school-made lunches with frozen, chemically preserved stodge to make profits at 87p a head. This was fresh food made honestly without much more than flour, water, yeast, and tomatoes. It just happened that the hands making it weren’t employed by the school. Every year the pizza lady, as the owner became known, would come to the classroom and teach how to make the very same dough at home. Shame that sort of food connection has been mostly lost in schools these days but I have hope it can return.
I also recall them serving finished pizzas with a bit of redneck rustic flair. A hunk of cardboard had two edges folded up to prevent clumsy childhood gravity accidents and a nothing more than a sheet of parchment stapled on top. I assume this was because trees were cheaper than dishwashers and even two extra sides and a lid cut into the slim profits of the day. They cut the pizza into four squares by default or left it whole if you were dashing back towards classes and asked for it ‘on the run’. One giant piece is easier to corral than four at full gallop you quickly learned. Any kid knows that the last thing you need to worry about is finding a knife when there’s hot pizza in the offing and while many a schoolyard debate centred on tearing off more than your fair share, hungry grade eights didn’t care about fancy. You could see a trail of the oil-blotted rectangles that led right back to the front door of the school. I think the headmaster even started his own penalty system if he caught you tossing your pizza debris in the bushes.
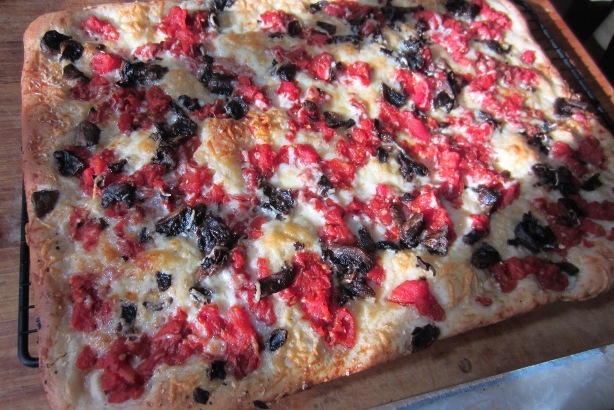
Fast forward to today and I want to show you my dead simple, every day (literally if you wish) pan pizza that takes absolutely no special skill, equipment, ingredients, or time to make. Is it my favourite version of pizza? That honour probably goes to high-heat thin crust recipes made on a charcoal kamado. Do I make this version often? At least once a week, particularly when I want something fast with no effort. Can you put anything you want on it? Pretty much, as long as you don’t fall into the number one rookie pizza maker trap of loading too much on top.
I just timed myself and ‘hands on time’ was a whopping eleven minutes. From the moment I had a pizza notion to the time I had hot pizza fresh from the oven in my mouth was just short of two hours. Is that really too much to ask, even on a weeknight? If you’re that tired, you need a new day job I say. And oh yes, it cost me a sum total of $3.89 *. Given just a few common items already in the pantry that’s pretty damn good for a huge 12″ x 18″ feast that can easily feed two hungry pizza hunters. Compare that to calling the delivery folks or buying a frozen cardboard disc and I think you might have to come over to my pizza obsessed dark side.
* Canadian Dollars of course. I did the actual math to the penny. I’m just that much of a pizza geek.
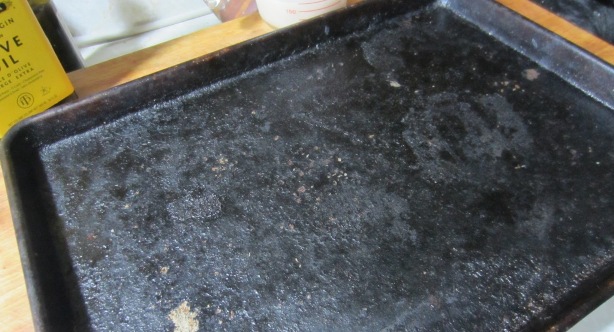
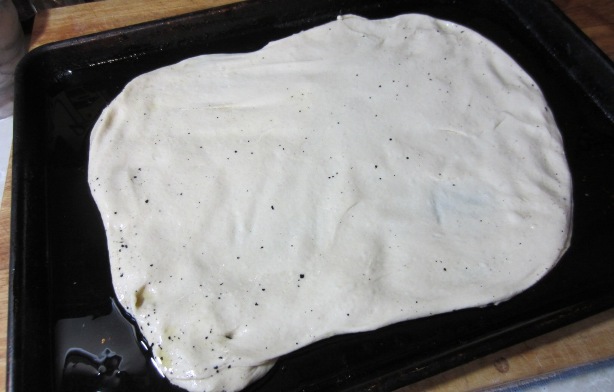
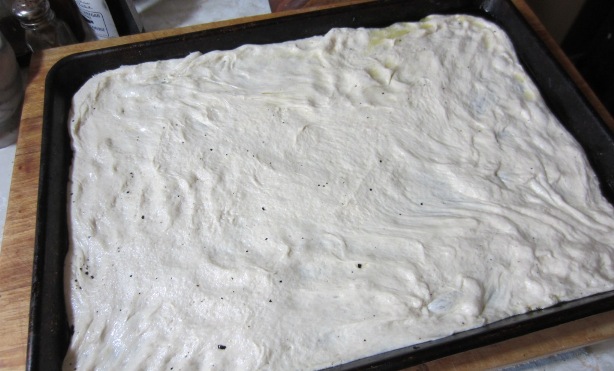
To start, this pizza is made in an ordinary pan with plenty of oil in the bottom as a bit of a trick to ‘fry’ the crust from below. No baking stone needed although I say it never hurts to keep one parked in your oven all the time. You can absolutely use bright shiny new pans but as they age and darken with use, you’ll get better and better pizza off of them. Every high heat cycle of oiling and baking improves the crisping and natural non-stick qualities, just like seasoning cast iron cookware over time. You can see mine below and since this one is dedicated to pizza I never let soap near it. I barely wash it with only water and never scrub it to maintain the built up pizza making magic.* It’s about a decade old but started life as ordinary uncoated aluminum. If you haven’t found your nearest restaurant supply store this is a good excuse to do so because there you can get ‘half sheet’ pans (as they’re technically called based on commercial sizes) for about five bucks each. Professional kitchens have stacks and stacks of these work horses but there’s nothing special about them save for the fact they DON’T have a factory non-stick layer applied. Those chemical coatings are dangerous at high heat and the oil technique renders any such modern non-stick witchcraft completely unnecessary.
* You can see black flecks of that seasoning in some of the dough photos below. That happens when the pan has been reheated and I took the photos on my second pizza of the day when the pan was particularly moody. Nothing at all to worry about. Extra free flavour to my mind.
To get this pizza on the table in a hurry, you have to take some dough rising shortcuts. Cranking up the amount of rapid rise yeast gives you a very light crust quickly and while it wouldn’t pass muster in a lot of traditional pizza circles, it still tastes great if you just let the dough do its thing and rise into a delightfully crisp pillow for your pizza to rest upon. The coating of Parmesan all over certainly doesn’t hurt either. Pizza making is bread baking after all. Pumpernickel is just as valid as sourdough and quick sheet pizza can be every bit as interesting as slow-rise wood-fired crusts. If you’re used to fighting over the ‘middle’ pieces and think the edges are just handles, prepare for an eye-opener. I call dibs on the corners.
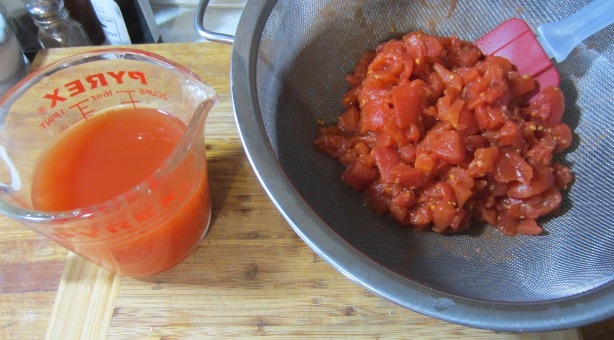
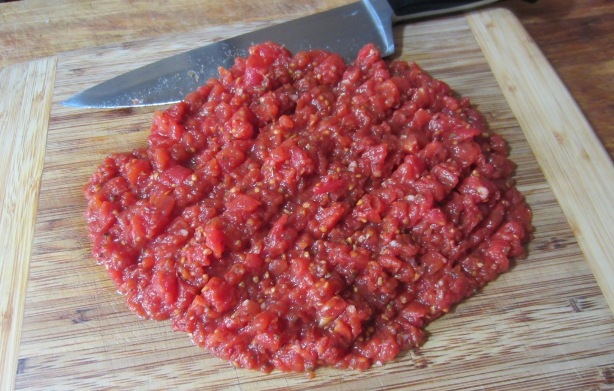
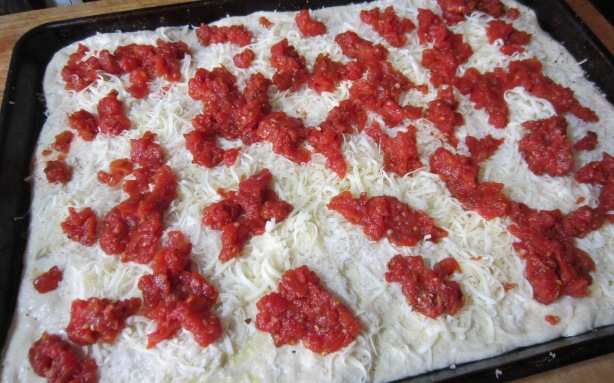
This version of pan pizza doesn’t suffer excess moisture well. Countless homemade pizza recipes fail miserably when they take traditional sauces and toppings and merely heap them onto quick dough spread out in a pan. A traditional sauce that has the benefit of a sturdier crust or higher heat cooking usually works fine but in this case for speed pizza, we want significantly drier toppings. Since tinned, chopped tomatoes are picked and processed at the peak of flavour, they’re a great starting point that just need to be drained well * and enhanced with a few flavours. No long stewing of a marinara here. Save that for other pizza days when you have plenty of time. Depending on your brand, you may need to chop them down slightly but I would not suggest switching to fully crushed tomatoes nor would I even bother with pulses in the food processor because both will likely give you soggy tomato mush on top of your pizza. Pieces of tomato are a good thing, you just don’t want them too large. Similarly, buy the widely available no-salt versions so that you can stay in control of the seasoning to your preference.
* Leftover juice is fine boost to other dishes but it must be sealed and refrigerated immediately for use within a few days. Try paella (or any rice dish), slip it into a soup, or reduce it into sauces. I use it to make beans if nothing else comes up. You’ll get nearly two cups from a single tin of tomatoes so don’t waste it.
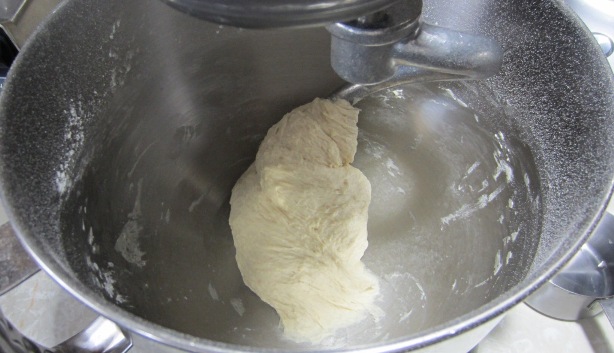
A quick note about the machine of choice here. I really like using my food processor for traditional pizza dough because it allows for significant structure development in a hurry and the subsequent long slow rise makes for tender results. For this quick version however, it seems to do more harm than good and I revert back to the trusty old upright mixer. A common mistake is to only knead the dough until it looks like a cohesive ball. That’s only half the work and you should allow the machine to continue kneading for a good eight to ten minutes in order to gently work the gluten structure. The end result will be a noticeably smooth dough that’s fairly sticky, at least until you wrestle it into the oiled pan.
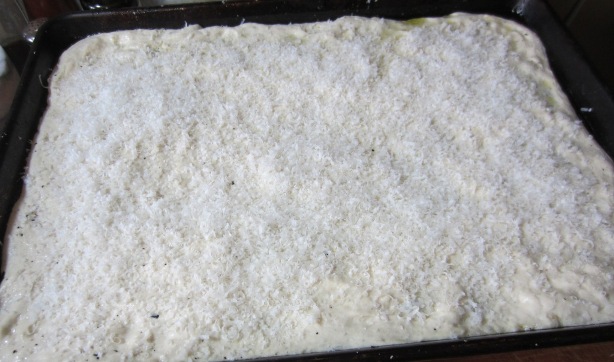
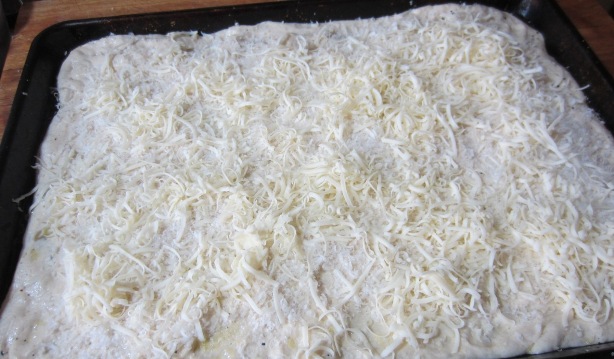
Cheese is a must and relatively dry Parmesan is a real champion here. Lots of flavour punch with just the right amount of salty goodness. I usually add some mozzarella but not nearly as much as when topping most other versions of pizzas. That’s huge coming from me, the self-anointed king of cheese consumption whose deep-dish pizza recipe calls for more than half a pound of provolone on top of again as much mozzarella. Even I have to admit that in some cases you can have too much of a good thing and this is one of those cheese restraint moments. Common ‘brick’ versions of mozzarella work fine since the other cheese will round out the flavour but torn chunks of fresh buffalo-milk ‘ovolini’ if you have them are divine. With the baseline of Parmesan as a potent starting point, it’s a handy place to use up end bits of other melting cheeses like Gruyere or Fontina that might be hiding in your fridge looking for a good home.
Finally the toppings need to be fairly dry and cooked beforehand but my proclivity towards mushrooms has taught me that even simple white button versions can be wrangled into something spectacular. If you have wild or otherwise interesting varieties all the better. A spare sweet onion raw or slow cooked into further sweetness is always available in my pantry. Half of a red bell pepper left over from taco night tossed under the broiler to char adds delightful smoke as would a handful of garlic cloves baked into submission while the dough rises. And of course the carnivore favourites of pepperoni and sausage can all be used here but once again, you can’t (*can’t*) put too much on top without ruining the crust action. The whole construct needs to be light enough to allow the dough to rise and crisp if you want it to satisfy like more elaborate pizza recipes. People forget how important the crust really is in the big pizza picture all too often but you fine readers are much smarter than that I’m sure.
If there is any downfall to this quick pizza it’s that the light, airy crust doesn’t hold up to reheating well. Just eat the whole thing the night you bake it. If that’s too much for your own appetite, invite a friend over. Make them bring wine.
Speed Pizza in an Ordinary Sheet Pan
180ml (3/4 cup) water at 40C (105F) (aka warm not hot, don’t fret about exact temps)
7g (2 1/4 teaspoons) rapid rise dry yeast
1 teaspoon sugar
1 + 2 tablespoons olive oil
240g (8.5 ounces) bread flour (no, you can’t use all-purpose)
1/2 teaspoon fine sea salt
Optional (pick one or none, or get creative with whatever you have handy):
1 teaspoon dried oregano, crushed
2 teaspoons fresh rosemary, tough stems removed and chopped fine
1/2 teaspoon freshly cracked black pepper
8 black olives, chopped fine
For the ‘Sauce’ Tomatoes:
One 796ml (28 ounce) tin chopped tomatoes, no salt added
1/2 teaspoon fine sea salt (adjust or omit if you unwisely use pre-salted tomatoes)
2 teaspoons wine vinegar
2 teaspoons dried oregano
1/2 teaspoon red chile flakes (optional)
Cheese:
25g (~1/2 cup volume micro-planed) FRESHLY GRATED Parmesan – DON’T cheat!
75 g whole milk firm or fresh mozzarella, shredded fine or torn as necessary
50 g of any other melting cheese (or increase mozzarella amount by same)
Other toppings (choose one or two, or go naked with just cheese and tomatoes):
20 leaves of fresh basil, cut into fine strips
115g (4 ounces) white or brown mushrooms (see my “How To Cook A Mushroom” post)
1/2 large red or yellow bell pepper, roasted, peeled, and chopped roughly
15 pitted kalamata olives, chopped roughly
A head of garlic roasted until sweet, cleaned and chopped
1 medium sweet onion, raw or cooked down gently in butter as preferred
50g maximum of any cooked meat (e.g. pepperoni, sausage, etc) *
5 paper thin slices of dried ham (e.g. Prosciutto, Jamón Serrano, etc)
This list could be endless, you get the idea. Less is more.
* For pepperoni and similar, microwave slices between sheets of paper towel on high for 45 seconds and blot excess oil away.
Yield: One incredibly tasty 12″ x 18″ pizza
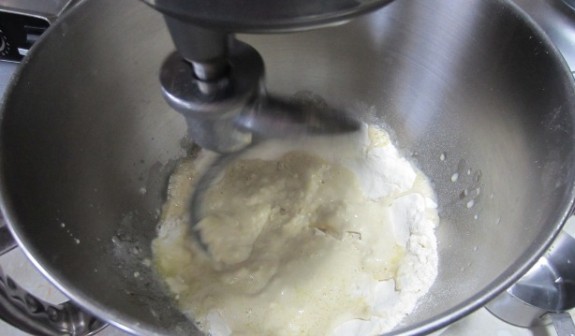
Add the yeast, sugar, and warm water to the bowl of an upright mixer. Whisk by hand until the sugar is completely dissolved. This step isn’t absolutely necessary with rapid rise yeast but it’s worth doing for the few minutes it takes to measure out the rest of the dry ingredients. Add one tablespoon of the olive oil to the bowl along with the flour, salt, and any optional flavourings you prefer. Machine process with a dough hook attachment on medium until the dough is very smooth, anywhere from eight to ten minutes. You may need to coax some of the flour from the sides of the bowl in the first minute but otherwise simply allow the machine to do all the work while you prep the tomatoes.
Drain the tomatoes for several minutes in a fine mesh strainer, scraping underneath with a rubber spatula occasionally to dislodge more juice. Add the salt, vinegar, oregano, and chile flakes, stir to combine, and place in the refrigerator until needed. When ready to use, drain again briefly to get rid of any extra moisture that rendered over time. Depending on your brand, you may need to run a knife through the tomatoes in a few directions to reduce their size.
Place the remaining two tablespoons of olive oil in an 12″ x 18″ aluminum or tin sheet pan (called a ‘half sheet’ in restaurant supply stores). Do NOT use pans with non-stick coatings – they can be dangerous in high heat cooking and aren’t needed with this oil technique. Spread the dough out to cover roughly two-thirds of the pan trying to keep most of the oil underneath. It should be very simple to achieve this first stretch without overworking or fighting the elasticity of the dough. Cover loosely with plastic film and set in a warm undisturbed place (e.g. your oven with the heat off) until double in size, anywhere from 45 minutes to an hour.
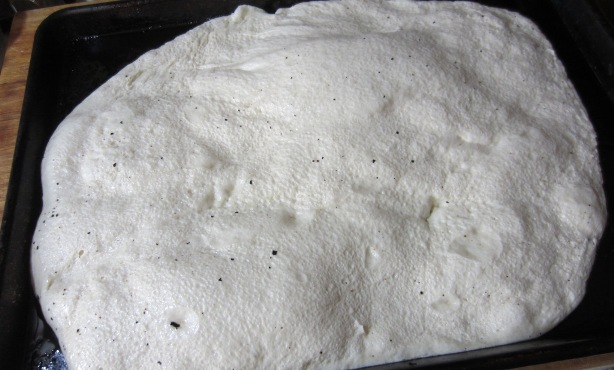
When risen, remove the film and finish pressing the dough to the edges of the pan. Again, it should be easy now that the dough has rested during the rise. Allow to sit again undisturbed for about 15 minutes. Preheat your oven to a full 260C (500F).
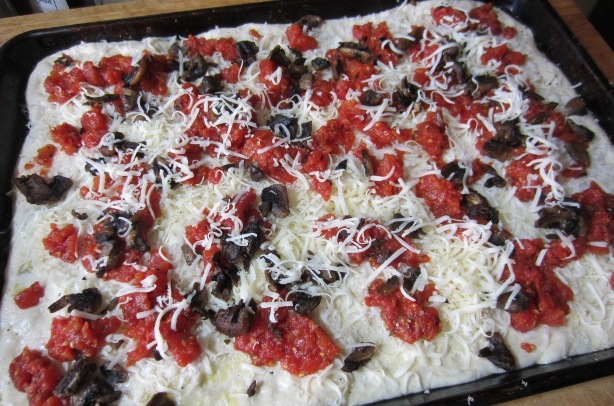
Using a microplane or similar, grate a thin layer of Parmesan over the entire surface of the dough. Follow with the rest of the cheese, then the drained tomatoes, and finally any other toppings you prefer. The cheese on bottom helps the dough to crisp better and buffer the crust from any residual moisture in the toppings.
!! DO NOT overload this pizza !!
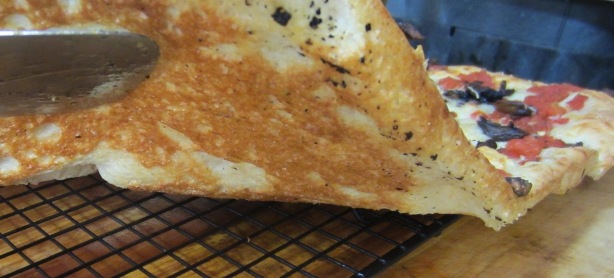
Bake for eight minutes and then rotate the pan back to front. Continue baking until the crust is golden brown, anywhere from five to ten minutes longer, being careful to watch closely toward the end of baking. At these temperatures things can change quickly.
Remove the pizza from the pan to a wire cooling rack immediately to prevent residual steam from making the crust soggy. Cut and serve after five minutes if you can bear to wait that long. Make one night a week ‘pizza night’ and have contests with your friends to see who can come up with the best flavour combinations.
V.6.3
lady1841@yahoo.ca
9 October, 2015This pizza recipe looks good and I shall give it a whirl. Thanks.
Mr.Spork
14 October, 2015Hope you like it. I actually just made one this afternoon myself. Mushroom and onion for the record. Cheers!