
Autumn is here and for me that means chapped lip season.
You know my consumer outrage when I feel like I’m being ripped off. Case in point, lip balm. I was partial to those tiny jars of the stuff so conveniently kept in a pocket this time of year. I went to stock up at the Massivemart and sure enough, what used to be a buck or two is now $5.29. For barely eight grams of the stuff. It’s mostly wax, right? Or is it petroleum? Lanolin? Distilled voodoo from the island of Expensivetopia? I had no idea but I wasn’t paying that price for it. Thank you interwebs for some answers.
Turns out most of the brands have had their secret recipes dissected and while all the usual suspects make up the base, the ‘active’ ingredients like menthol can make the stuff *worse* for your dry lips according to some. And I suspect moderately addictive. Like a bad chain smoker, I decided to go cold turkey on the commercial stuff and whip up a batch of my own. I’d like to tell you the cost for an equivalent amount of my homemade recipe but the math is so small that I have to tell you that it cost me a dime for three times (THREE!) the amount you get in the little tins. That’s enough to last me all winter made in less than ten minutes. For a DIME! What are they thinking trying to charge more than fifteen bucks for that much? Sheesh.
I already had the widely available coconut oil in the pantry from some other tests – it being one of the hip trendy new oils du jour amongst the natural foods set despite differing opinions on whether it’s the latest super food or worse for you than a giant tub of butter. I think I paid five bucks for big jar of the stuff and only needed a spoonful for this recipe. If you don’t want to buy that much barter for a few thimbles worth from a hippie neighbour. It really is that small of an amount for this batch. While solid at room temperature, it acts as the naturally soft base agent in the mix that will liquefy closer to body temperature unlike the much harder beeswax that needs applied heat to melt at around 63C (145F). That means with a two-to-one ratio, the mix will barely melt onto your fingertip just like the stuff you buy ready made. If you have fingertips like the Ice Queen, you might want to soften the mix by leaning a tiny bit farther towards the coconut oil. If your secret identity is actually Heat Miser, slip in a bit more beeswax so it doesn’t “melt in your touch… you’re too much…”. An extra gram or two each way should suffice but remember you can always remelt the whole batch and adjust until you get it right.
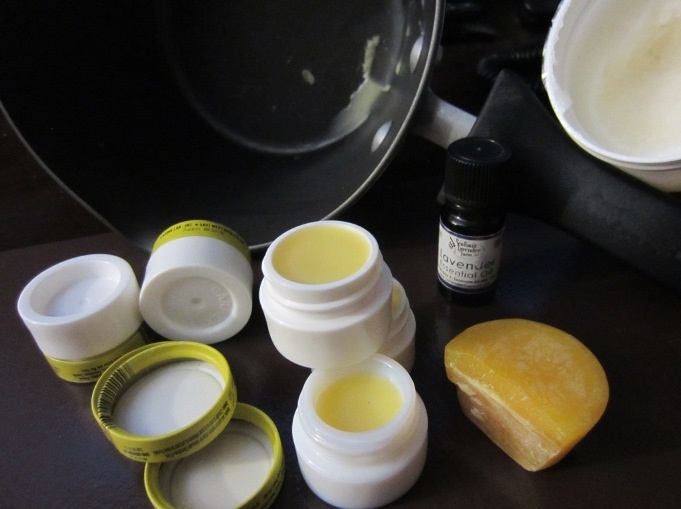
The little puck of beeswax you see above cost me a quarter from the honey woman at the farmer’s market and is easily enough for five batches. I can’t even calculate what the three drops of lavender oil from my friends just up the road at the Seafoam Lavender Farm cost. Three cents, maybe? For some reason in a fit of lip-balm-making premonition, I had saved a handful of empty Carmex jars * so the universally accepted rat’s nest rule says if you’ve completely forgotten what you paid, they’re free.
* As a side note, you can buy the very handy and tiny empty jars in a gadzillion online places for about a twenty cents each if you want to make heaps of this stuff as gifts and didn’t save enough empties like me, the cheapskate writer. Or you can find some other creative leak-proof, pocket-sized containers by digging around in your pantry and medicine cabinet. Just remember this stuff can remelt spontaneously in, say, a hot car parked in summer sunlight so avoid a leaking mess and assure containers seal up tight.
Get a cheap pan just for melting waxy things because it will leave residue in anything you plan to cook with in the future. I got mine for five bucks at a Canadian Tire sale when I was cooking up some wood polish knowing it would get trashed. Totally crap pan that I’d never cook in but as the top of a mad wax scientist double boiler, it works perfectly. This one also happens to have a cheap non-stick coating which I’d never use around food but in this case, it seems to help things along in the big melt.
Essential oils can be added for flavour or medication. Use up to eight drops of any combination to start your first batch and increase to your preference after taking a sample off the end of a cooling chopstick. Note that these are essential oils and not flavour extracts, the latter of which don’t hold up well under the heat of melting. And of course make sure anything you use is approved for food use. Not all essential oils meet that criteria. In fact, some people can have severe reactions to even a few drops of some oils diluted in a whole bathtub of water. Know the potency and composition of what you’re using and start slowly. My test batch was three drops each of lavender and peppermint.
A few suggestions:
lavender – good for healing skin
menthol and/or camphor – good for that tingly feeling but some say it’s too harsh on your lips
peppermint – mostly for flavour to me but others say it has restorative properties
orange – again, mostly for flavour and can be harsh so don’t use more than a drop or two to start
I’m sure there are hundreds of other choices out there from the people that are really into making this sort of stuff but I just used what I already had around the house. There’s no real coconut-heavy taste from the oil side of the equation but the beeswax comes through clearly in a pleasant, no-additives fashion. Even without extra oils, the naked beeswax and coconut oil combo functions easily as well as the ready-made versions on the lip protection and repair front for me.
And did I mention it cost me a DIME! Take that you blasted industrial five-dollar lip repair ambulance chasers!
Homemade Lip Balm
8 grams pure beeswax
16 grams coconut oil
up to 8 drops of essential oils (optional)
Yield: Enough for three of the usual tiny jars
Set up your discount boiler by stacking a cheap pan you don’t consider to be precious into another filled with water set to simmer on medium heat. Don’t go nuts with the heat or fill level so that water doesn’t inadvertently splash into your brew and seize up the wax. Dump everything in and stir with a chopstick until completely melted, about five minutes. Pour into your sterilized containers, let cool for an hour, done. Any little heat-proof pot will do as will a small mason jar if you make too much or don’t have enough tiny containers saved. Remelt as needed for transferring and adjusting to taste or texture preference. Your lips will thank you for the effort.