I’m regularly asked ‘how do you personally start plants from seed?’ Having just gone through the annual ritual I thought I’d document the method I’ve developed over the years. During my busiest seasons I’ve had as many as a thousand seedlings at one time with my little plant factory approach. Lots of incremental changes and year-to-year experimentation have tweaked my success rate right up towards the top percentile. A few tricks will have you skipping the more expensive and less interesting ready-made plant starts that seem to pop up by the truckload in parking lots of big megamarkets this time of year. If you’re too late in your own local season this year, remember these pages for next.
Right off the bat two things. Biggest rookie mistake is being TOO gentle with your seedlings. I’ll explain more in a bit but it’s such a common error I want to say that plenty of times. Treat your seeds with kid gloves once they emerge and you’re doing them no favours once they get out into the real world.
The second important disclaimer is that I’m in a challenging climate. I’d never trade Canada for hotter climates but it does make tomatoes tricky every year. For first time gardeners my suggestion to do a little of both seed starts and quality pre-purchased plants, hopefully from a local farmer so there’s not a lot of ‘climate shock’. If you’re in Mexico, Northern Australia, or have a superb greenhouse, you might not need to worry as much about the niggling details as I do up here in the hinterlands. To illustrate this point, as I type here in the middle of June we had frost warnings every other night this year right up until last week. There was enough that I had to scrape my windscreen clear to see through if that tells you anything about our nightly temperature swings. Luckily today it’s back up to a respectable 26C at noon but my temperature logger tells me I can bank on 5C again tonight.
Onto the seed starting process which joyfully begins with all sorts of ambition as soon as the fresh crop of garden catalogues arrive in the dead of winter. The whole point of starting your own seed is that you can choose varieties you’d rarely if ever see coming from the commercial greenhouses supplying the big box stores. They tend to only plant heavy producers with fool-proof germination rates. An empty pot to them is lost revenue and they almost always play it safe year after year when it comes to variety. If all you want are ‘early girls’, ‘big beefsteak’, or a few stock standard green peppers, my advice is simply to wait and buy them from those mass market outlets for $3 a piece come spring. You might even get lucky and find a local farmer on the roadside with some spare to sell so roll those garden dice as you see fit. Even I procure a few special varieties this way when they literally can’t be started from seed.
French tarragon (the sort used for cookery) is the reference case here. Any packet of ‘tarragon seeds’ you see on store shelves, despite pretty pictures of kitchen cutting boards and piles of ingredients on the label, aren’t the right sort of plant for your béarnaise sauce. Those seeds are Russian tarragon that will produce identical-looking plants but have zero flavour. Sage too is difficult to get going from seed and rosemary always seems to do better from cuttings if you want two more examples of when to bypass seeds and jump straight to developed seedlings.
As quick as I am to spend an hour with any seed catalogue that shows up at my door – they all have me on their lists by now as a easy target – I have to say two words of caution. Restraint and frugality. There’s something in the brains of gardeners, cooks, and even people that have never touched a plant in their life that gets stimulated beyond control at the prospect of all those gorgeous mature plants so perfectly pictured on the pages. Many is the time I’ve ordered more than double what I had space for in the yard. Make a pencil sketch of your space and don’t go over that plan… too much.
I’ve done a better job of embracing the frugal side of that equation in that I only rarely order a particular sort of seed more than once. That doesn’t mean I don’t grow multiple years of the winners, only that I have become an obsessive seed saver. There’s zero reason not to harvest your own seed from the strongest plants each year and only in rare cases would I re-test a variety that failed the first year out of the gate. There’s simply too many I want to try to revisit the slackers and I’ve come to understand that everyone’s varied soil conditions and climate, hot or cold, will simply include certain species that just won’t grow. Dwell not and move onto the next candidate. My seed bank happily resides in the bottom drawer of my fridge waiting to burst forth with bounty and as long as I manage to refresh each packet with a new cropping every third year or so, I have no germination problems. With some tricks you can even get ten year old seed to wake up in a pinch without having to call up Svarlsbard.
Once you have your array of choices you need to think about timing and space. Sort out when your last frost date will historically be and then read the packets for direction here. For me that means my peppers get hot house conditions starting in May with tomatoes soon after. Cold tolerant seeds like peas and mint can start a bit earlier as can vine crops like cucumbers and pumpkins but this again is all down to your specific local micro-climate. Just give the whole year’s time line some consideration. Do you want successive plantings of peas? Do you have room for more pumpkins? What does the packet say maturity dates are for crop A and will I have time to put crop B in its place after? Am I rotating my beds enough? Do I really want to try to grow artichokes that take five months?
When the right time comes, you need to get seeds in dirt. Maybe. Certain plants will benefit from a quick 4-8 hour soak in a weak potassium nitrate (salt peter) solution. I use one teaspoon per litre to make a bath for tomato and pepper seeds, particularly if they’re older. It helps to soften the seed coat and makes their emergence more likely but be careful not to go too long lest you completely disintegrate the seed itself.
I aim for three distinct stages of seedling before planting out to the garden. Namely germination, deeper root development, and finished pot with the last usually being on the order of a 4-inch size. Any larger and you really should have been in the garden plot or ticking away in your hydroponics system by then (more on the latter in another article someday).
Germination is a bit of a crap shoot so I like to over-seed a bit but importantly, I don’t do this in an individual-sized pot. Two or three seeds in the same hole of a 1-inch pot might sound like a good insurance policy but you end up getting (at best) three weaklings. What I do since seeds don’t need depth for germination is re-purpose old mushroom trays (see photo) with only an inch or two of soil then ‘surface scatter’ more soil on top to cover.* There’s no sense in trying to make multiple precise-depth holes. It also allows you to press the seeds firmly against the soil before covering to ensure good contact. Nearly all seeds want this and it’s one of those odd little details that will up your germination rate. I have a block of wood cut to size that perfectly presses the whole tray at once before I cover with the prescribed depth of soil and give another light press.
* It’s important to know your plants here because some seeds, like many lettuces, actually require exposure to sunlight for germination. No covering necessary.
Surprising to some, the soil for this stage is particularly devoid of nutrients. More important is appropriate drainage and friability (pertaining to the texture of the soil) rather than the need for rich compost or fertilizer boosts. The seed has everything it needs right there inside. Mother Nature is convenient like that.
If I have a five inch square area I’ll likely throw in 6-10 seeds evenly spaced but once the first four have come up and show their seed-leaf, any late comers are ruthlessly pulled out. It took me years to be this brutal wanting to save every last seed that had come so far but as I said above, seed starting is a tough world and the remaining plants will thank you for it. Importantly here are known germination temperatures for each crop. Tomatoes and peppers typically need 27C (80F) soil temperature for the best success which can be achieved inside easily. Skip custom-made greenhouse heating mats which are too expensive in my mind and use an ordinary heating pad leftover from the last time you twisted your ankle. Even a warm spot next to the kitchen stove has worked for me in all but the most picky of cases.
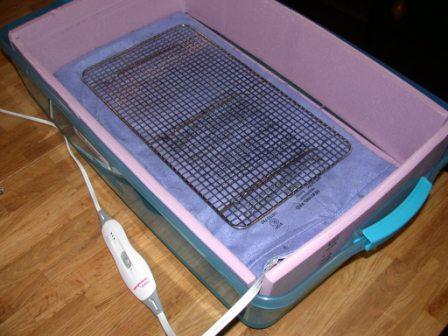
My germination box above was thrown together to work in the middle of cold January by insulating the bottom and sides to hold the heat and a baking rack to elevate for air circulation. This also keeps plants from direct contact with the heat source which could actually overheat the soil and cook them before they come out. A cheap Christmas lights timer lets me cycle the heating pad through the night but I’ve noticed newer ‘digital’ versions irritatingly won’t work there. You want an old-style mechanical control. I keep things damp to encourage seed sprouting but am careful to open the box several times during the day to avoid the dreaded ‘damp off’ that happens when kept too contained and humid. You’re seed starting, not making a terrarium.
Critically, the MOMENT you see emergence, it’s time to get them out of that hot box. If the seed thinks it’s late to the summer party it will shoot up and go ‘leggy’ even if the calendar still says March. Remember that germination temperatures only signal the START of a season to a seed. Even they know that the first warm day doesn’t mean it won’t drop back down to cooler temperatures at the beginning of the year. Once you see anything green, get them out into normal household temperature. A sunny window by day or a warmer cozy by (cold) nights. Countless “shoulder-season” crops are fine down to frost levels and some like cabbage and peas even prefer a chill. A cold frame full of spinach or kale can have six inches of snow on top of it and keep growing without pause. Even many cold-tolerant tomato plants (as opposed to seeds) are quite happy right down to 15C once they pop out of the soil and show their little green heads but of course you’ll want to hope for warmer days if you ever want to actually pick a finished tomato.
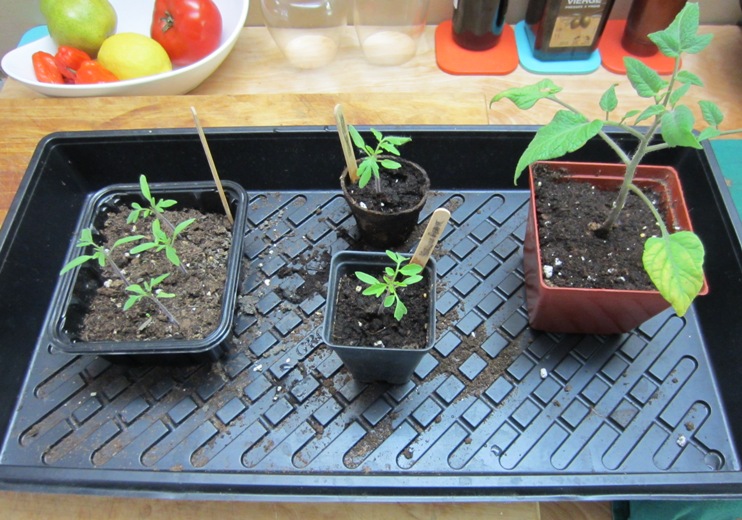
That first bit of foliage that comes out – known as the cotyledon leaf or “seed leaf” – will be pretty nondescript and curiously looks identical between species in most cases. Only the second leaf set will begin to show a difference which means if you want to know what you’ve got in each tray, it’s time to make some labels. After a decade of using everything imaginable for the task from wire tags to plastic forks, I’ve settled into using popsicle sticks. I bought a box of a thousand about five years ago for under $5 and I’m still only halfway through. At this stage you want cheap, especially if you’re giving away your surplus plants to friends and neighbours. Once you get good at this process, you’ll ALWAYS have surplus to give away I’ve found. Part of my spring fun is bartering for other plants or whatever else the locals want to trade. “Six interesting tomato plants you can’t buy anywhere? That’ll be a dozen eggs or a future week of cat-sitting please.” Free plants make great neighbours.
As the second ‘true’ leaf emerges your seedlings will want to throw down roots with “down” being the key word. That shallow germination tray won’t do for this stage so it’s time to pot them on into something not necessarily bigger in diameter but certainly deeper and thinned to one plant each. Importantly, you want to do this long before the plant has gone thin and whispy in an attempt to spend all it’s seed-contained energy and reach for the sun, aka ‘going leggy’. Plants have no idea they’re going to be moved so they’re giving it the best try they can to survive even if it kills them in the process. Don’t wait even an extra day for this move if you can avoid it because one really sunny day can be all it takes to go from stout sturdy little seedling to useless leggy weakling. If you absolutely have to delay until the weekend, pull them out of the sun and say mean things to them to stunt progress a bit until you can get round to the task.
I’ve collected a heap of tall-ish 1-2″ wide plastic pots perfect for rooting over the years and briefly run them through a mild bleach solution and thorough rinse each season to protect against lingering problems from the past (bacteria, moss, plant disease, etc.) Grab some reasonable potting soil this time that has a bit of perlite or similar mixed in for drainage. At $3 for a bag that will cover my entire effort for a year, I’ve found it’s worth it to ensure I have no stray weed seeds and saves me the effort of double sifting garden soil but either works as long as you get that perfectly textured soil. Fill the pots to the top and make a hole deep enough to set the seedling at roughly the same level. Gently fill in around them for support, give a light press, then top off with a bit more soil to cover and water well (and gently) around the edges.
It’s important to know the right way to touch a seedling here. DON’T grab them by the stem since even the lightest hand will likely damage beyond repair. You actually want to hold and lift by the sturdiest leaf then dig down will UNDER the seedling with a wide blade – I use another popsicle stick – to lever up the entire plant from below. Don’t worry, that leaf is pretty sturdy and can hold the weight of the whole thing at this stage. If it breaks off, that plant was probably doomed before you even touched it. Shake most of the excess dirt away and pop it into the hole you made in the next pot.
At this point you also know how many of your seeds actually germinated so you can pick your best then take all the surplus into ‘giveaway’ pots. Here’s the only place I employ single-use compressed peat ‘one-plant-sized’ starter pots (aka “Jiffy” pots). They’re cheap and will work perfectly well for a week or two until they become the recipient’s planting problem. Just instruct the new owners to get their seedlings moved on sooner rather than later or the roots won’t dig nice and deep for healthy plants. Remember that most plants will generally need to grow down as much as they grow up.
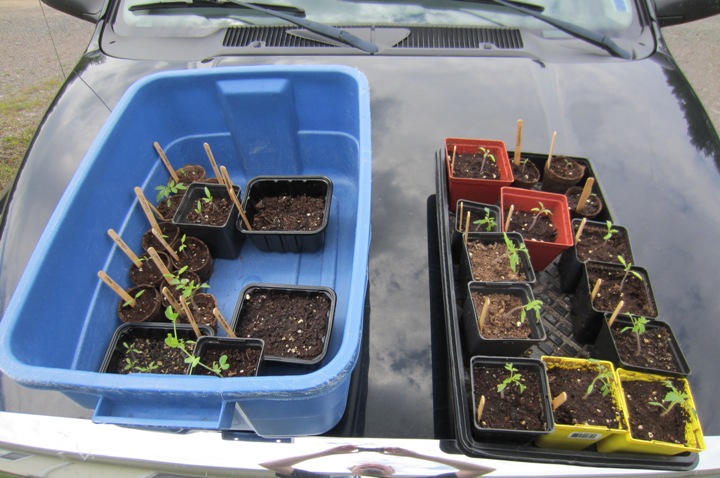
It’s also time to watch the thermometer outside if you’ve got your timing right. As soon as they can take some daytime outside get them there. This does a few things to urge along growing progress. First it’s free energy from the sun, even on overcast days. Just as importantly is the wind rattling their little stems every few seconds. Just that gentle wiggle is all it takes to prevent leggy growth and encourage stems that even the most rigid of Discworld dwarves would appreciate. This is that ‘tough love’ phase I keep mentioning. If your weather absolutely won’t cooperate, get a small oscillating desk fan setup inside to simulate a light breeze and gently run your hand over the leaves every time you pass. And laugh as you might at the photo below but the hoods of dark trucks and cars collect heat making them a perfect daytime parking spot for young plants when the weather is in a wishy-washy mood temperature wise. Perhaps even move them inside the car to a sunny dashboard if you’re really cramped for space on an unseasonably cold night but of course beware the random sunny day there that could roast them alive. You’ll also notice below that in the first week of ‘hardening off’ days I give them the smallest amount of wind protection by way of a tall-sided tub. Just as soon as they’ve gotten used to the shift I take even that crutch away to encourage standing on their own two feet… or erm… stems.
Sit back for a few more weeks and watch everything grow. Have a cup of tea and bask in the glory that is gardening from scratch. Full spectrum lighting if you’re forced indoors will be fine and with newer ‘cool’ light tech and cheap LEDs, you can garden indoors for literally pennies a day for a good while. Yes, I did the actual math – I’m such a plant spreadsheet geek. I’ve had tomatoes inside for upwards of two months during these stages with no ill-effects on the final plants. Unless you go hydroponic don’t expect many (if any) buds to form but that’s normal. The plant is concentrating on making leaves for the more intense heat and sun it hopes will follow before it even thinks about fruiting.
The last of my three steps is almost optional in many hotter areas but I go a further mile by re-potting again just as before into an even larger four-inch pot. It gives me another two weeks of root development under controllable conditions to triumph over chaotic weather wrenches in the garden works. Same potting soil but of course at this later stage the stems should be sturdy enough to handle directly. In larger containers too it’s time to start thinking about a fertilizing routine since they’ll easily strip what little nutrients are in the pot quickly and their internal seed reserve is long gone by then. I prefer liquid to granules and keep a ‘less is more’ mindset so as not to ‘burn’ the plants which can happen easily in pots. Once you’re in the garden, it’s a lot easier to develop a broader fertilization scheme tailored to your conditions and according to your plants.
So there’s seed starting 101. Hopefully the photo at the top of this year’s first six weeks progression makes a bit more sense now. For tomatoes I’ve got my favourite Brandywine heirlooms plus some tiny yellow pear (cherry-sized) versions, some prolific Mortgage Lifters, and a few fat sinister Black Krims going. The pumpkins, courgettes, cucumbers, and peppers are just too many to list this time around. I’ve even managed to keep the rosemary, mint, sage, and tarragon in pots over the winter happily ticking away on the kitchen counter. Stay tuned for the great hydroponic bucket overview which is a whole other discussion (but working so far).
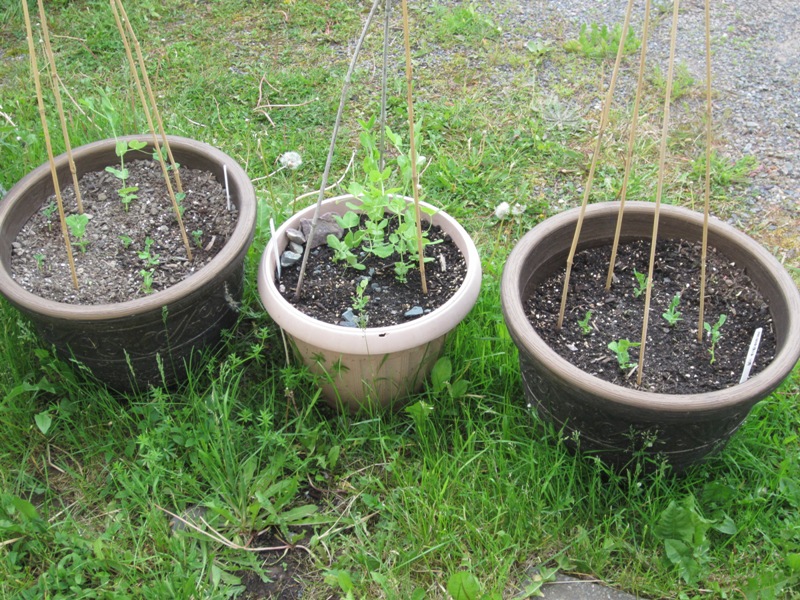
PS. Ignore everything I just said for peas. They go straight into the garden as soon as the ground is unfrozen and like the cold-ish spring.