
In the dead of winter I try to appease my inner gardener in lots of ways. I watch Gardener’s World reruns until I sound like Monty Don, I attempt to build beehives, and I pour over seed catalogues filled with their visions of future perfection in the dirt. I suspect a huge percentage of seeds sold are made on wishful thinking and never come to fruition but hey, seed collecting is a cheap hobby. Plus with a little germination skill you can get viable plants from seeds that are even a decade old. Nature is clever like that. I still say I’d sleep on a cot in the back of the Svalbard Global Seed Bank if they’d let me. All that potential at your fingertips and the place looks like a cool spaceship.
Another way to satisfy my growing urges in the cold season is sprouting. Not just alfalfa sprouts for your avocado sandwich or mung beans for your stir fry, you can sprout almost any seed that hasn’t been treated to prevent it. Lots of seed sellers cater to this market with everything from mustard to daikon to sunflower, each with their own unique flavour profile. Most give some character of their mature plant counterparts; radish has a subtle peppery kick and fenugreek a nutty aroma for examples.
Even if you never want to eat a single hippie sprout in your lifetime, there’s still room for sprouting in your gardening world. You can jump start both small and large batches of most seeds and then plant them farther along either in soil, on a growing mat, or hydroponically. All but the tiniest of seeds can be soaked and sprouted in a warm moist environment. A select few lettuce and other micro green seeds are minuscule and hard to handle in a sprouting sense – and the subsequent plants don’t like to be transplanted – but otherwise you can start a fine crop of everything from wheat grass to chia sprouts in a sort of ‘carpet planting’ fashion.
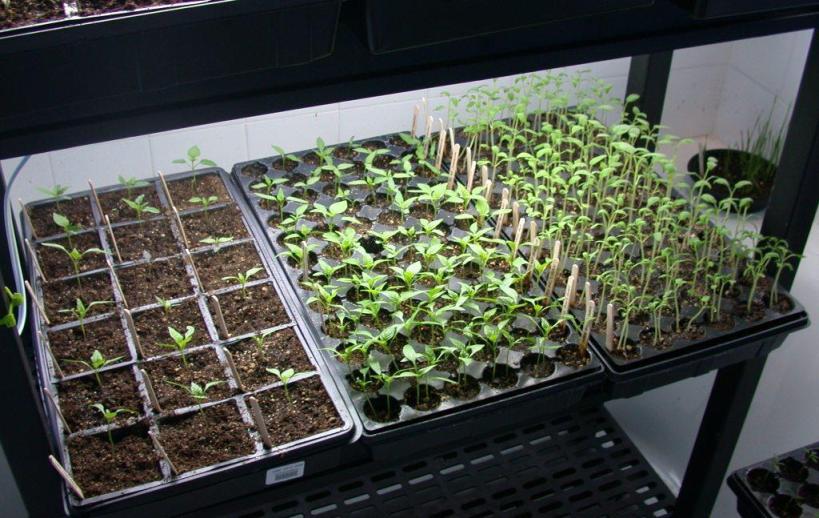
Where sprouting can really help the hopeful gardener is with a head start on warm climate plants, especially if you live in the snowy hinterlands like me. Tomatoes and peppers are notoriously picky when it comes to germination. Soaking self-collected tomato seeds in water for several hours before planting is mandatory because you need to break down the slimy outer covering that’s part of nature’s defence mechanism. In the wilds of feral, free-range tomato forests it’s broken down as the tomato fruit decays on the ground but the aspiring salsa gardener has to simulate this process with a soak. Some claim a bit of fermentation with the naturally occurring yeasts helps further nudge the seeds into action but in my experience even a short soak before that has a chance to happen is beneficial. Peppers too want warmer germination temperatures than even mild climates can muster on their own so unless you want your veg really late in the year, you have to get a head start with a good soaking.
In my own experiments, potassium nitrate (salt peter) available at most any chemist has proven to help some seeds along in their germination with just two teaspoons per litre dissolved in the initial soaking water. I’ve managed to get decade-old chile pepper seeds to germinate with this trick. It works even if you’re not actually going to force sprout them further by going straight into dirt after several hours in the solution. The theory is that it softens the outer seed coat and thus makes it easier for the sprout to poke out. Tomatoes seem to like it too but crucially you have to give them the temperatures they require for several days after – either in a warming greenhouse or on indoor heating mats if you live in the frozen tundra like me.
For successful sprouting all you need do is initially soak the seeds in water for a prescribed amount of time – it varies with seed type – and then leave them in a very moist, dark environment for anywhere from a few days to a few weeks at the temperature they demand. If you have access to well or rain water use that to avoid over zealous city-processing with chlorine and the like but don’t fret if that’s all you have. Generally you rinse the seeds every half day with fresh water to prevent mould and decay but even that is a loose schedule and seeds don’t worry much about such niggling details on their timescale.
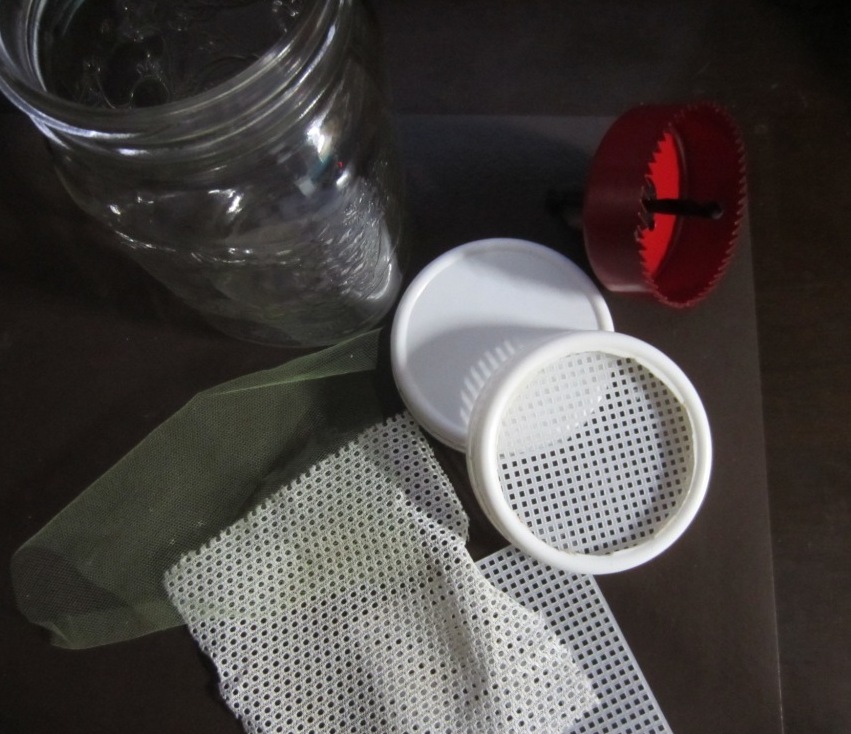
Whenever I have jars worth sprouting I park them next to the sink and just take a few seconds when I pass by to shower them off. A self-made sprouting jar is my weapon of choice here made simply by taking a one-litre glass jar and adding a plastic* screw-top lid modified with a straining mesh (video coming soon). Rigid plastic hobby mats can be cut for larger seeds or fine mesh fabrics can accommodate smaller seeds. They cost me about a buck in materials each and you can make a dozen to keep your sprouting cycle going non-stop. You want air to be able to penetrate to avoid decay but you also want as much of the free-draining liquid out between rinses. To that end, I park mine upside down in a dish rack to catch the drips and cover the whole affair with a thick towel since seeds demand the dark they’d normally get underground for the first few days.
* Avoid the metal closure that probably came with the jar. It will rust in just a few days given the wet conditions of sprouting. You can however use the inner lid as a handy template for marking and cutting your mesh screen inserts.
Whether you harvest them early as tiny sprouts to grow on into plants or later as large sprouts as an edible makes no difference to the basic process. If you’re trying a dozen precious breed pepper seeds in a shot glass or a cup of wheat grass in a one-litre jar for six trays worth of happy cats, the process is the same. Soak to start then rinse, cover, and repeat.
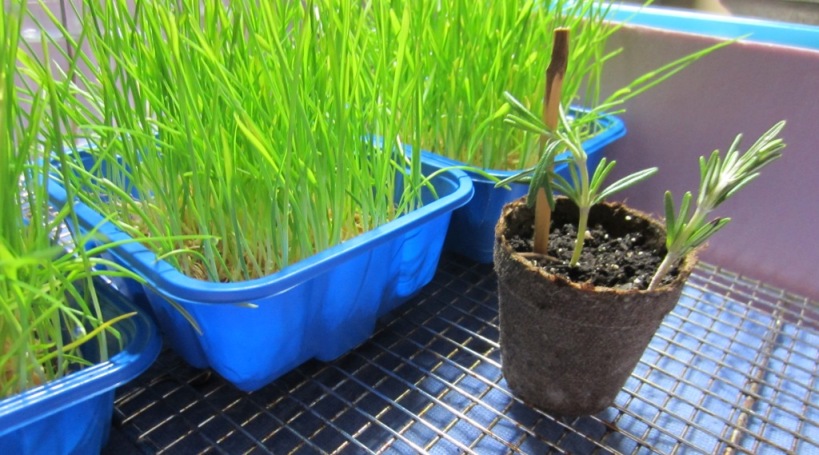
Of course some plants do much better from cuttings than seed. Mainly “softwood” growth plants like rosemary, bay, and any number or ornamentals. And if you have viable stock to work from you save yourself months of agony with the cuttings method not to mention this can sometimes be your only option if you have rare or unusual specimens you want to multiply. This is how I plan to propagate the sheer volume of plant stock I’m going to need for borders out at the farm thanks to some generous local gardeners that will let me harvest a few trimmings from locally hardy breeding stock. Clethra aka ‘summersweet’ as bee and butterfly food and camelia sinensis, the plant that gives us leaf tea are both already on my lists. A free cutting is lots better than even a $3 seedling and all it requires is a bit of planning and time.
Simply take several inches of new growth off the tips of the plant you want to clone and multiply like bunnies, strip all but two or three leaf sets starting from the bottom, and shove it in the ground. Be sure to work quickly as the time it takes to walk inside from the garden is critical with regard to moisture loss. Whether you choose to dip the ends in water and then hormone rooting powder is your choice but I’ve had luck both with and without that added insurance.
But what if you don’t have a plant to cut from in the first place? Well believe it or not some fresh herbs are like the cryogenically frozen space travellers of science fiction. Those that you buy in the grocery store are still sometimes viable for softwood plants because all the trickery companies use to keep them fresh for your kitchen also keeps them fresh for your garden. Cold chilling moments after cutting at the farm serves to preserve the plant stems fairly well. They’ve lost too much moisture in the process but it’s frequently possible to bring them back from the brink.
This all came to mind as I saw the small potted “rosemary Christmas trees” on offer this week at the Megastore. Those have been hacked and shaved to within an inch of their life to make the “tree” shape but if you push your trolley over to the fresh herbs section, you’ll usually see plenty of new growth shoved into ready-packs for the kitchen. While far from as good as your own locally acclimatized plants, these cutting will work with a little bit of extra help. At two bucks for a packet of almost a dozen stems, that makes for plants nearly as cheap as from seed.

Considering they’ve sometimes come from halfway around the planet, those cuttings need some serious resuscitation. You can’t just strip off the leaves like fresh trimmings from out the back door. First you have to make sure they are indeed softwood, i.e. the tips must still be flexible. Next you need to recut the bottom stem to allow water uptake. They’re thirsty after all that globetrotting. And then you need to strip the bottom leaves from most of the stem just as with fresh cuttings. Each leaf set attachment is a place where a new root can form. Now instead of going into soil, go into warmish water so the roots have the best chance to form. Roughly a third of cuttings won’t make it before getting too waterlogged but the rest will form roots in just a few weeks. I keep mine on a warming pad set to cycle a few minutes every hour because warm temperatures are essential for the plant to recover.
As soon as you see a few roots forming it’s time to pot them on into good soil and set them in the best heat and light conditions you can manage. Since I’m doing this in winter typically I find the warmest window by day and then pull them into cat-restricted warming boxes by night. Just this little bit of planning ahead for next spring will have me well stocked on seedlings for the greenhouse whenever the sun finally makes a return. Sprouting three trays of cat grass at the same time will keep my girls preoccupied long enough not to devour the rosemary tips in the process.
Have yourself a happy cat (grass) Christmas.